I’ve finally caved and made a video about how to get by in Japan when you first step off the plane. The fact of the matter, is that if you’re coming to Japan, you’ll probably be arriving at one of Tokyo‘s two international Airports: Narita or Haneda. For that reason, and the fact that I live in Tokyo, I’ll be covering this from the perspective of landing at those airports.
Here’s the things you’ll wanted to get sorted in your first 60 minutes.
Download a PDF of the LWIF First Hour in Japan Survival Guide v1.2 by clicking here.
*** Note: This is v1 of this guide. If you have things that you think should be corrected/added, please reach out at greg@lifewhereimfrom.com. Also, if you have ideas for surviving the next 23 hours, I’d love to know what they are.
*** Note2: These are all personal recommendations, this is not sponsored content. So this advice is what I give to my friends and family.
Cash
While Japan is technologically advanced in many ways – the virtual currency bitcoin is legal tender – it’s also simultaneously behind, with many businesses still only accepting cash as payment. Whether it’s vending machines, ramen restaurants, or ryokans (traditional Japanese inns), you’ll need cash to pay for many things.
As such, you’ll need to get your hands on some Japanese Yen (¥). You’ll sometimes see it written as ¥10,000 or 10,000円. They both mean the same thing. As a note, there are no pennies or decimal places in yen, so the numbers can seem high for those used to dollars or Euros. But an easy trick is to take off two zeroes to find out the equivalent value in USD.
For example, ¥10,000 is roughly equivalent to $100 USD (or if you want to keep the same amount of digits, $100.00). At current exchange rates (February 4, 2018), it’s actually worth $90.80 USD, but I think you get the point. Lop off two zeroes or add a couple decimal points and you have a quick and dirty conversion. Even though Canadian dollars (CAD) is worth less than USD, I still use that for myself (being Canadian), as ¥10,000 works out to $112.90 CAD.
Speaking of exchange rates, you’ll need to get your money exchanged. What’s the best method you ask? It’ll depend on the currency you’re coming with, but the simplest and safest way I can recommend is to use an international ATM. Because the 7-Eleven convenience store and Japan Post both have international ATMs, and because they can be found all throughout the country, you should be able to easily withdraw cash wherever you are. Most Japan Post ATMs aren’t open 24 hours, so you’ll want to keep that in mind. 7-Eleven ATMs, on the other hand, are open 24 hours.
While those ATMs will accept international cards, you will want to check a few things with your bank:
- Can you use your card in a foreign ATM? All major Canadian banks allow this, but there are thousands of banks throughout the world.
- Are there any withdrawal restrictions, whether they be daily limits or automatic fraud protection, that will freeze your card or limit your overseas activity.
- What are the fees associated with withdrawing foreign currency funds? I’ve seen ranges from $0 for the transaction fee and 0% for the currency exchange to $5 for the transaction fee and 3% for the currency exchange.
The TD Bank in Canada has a page for such inquiries, and they recommend contacting them before you travel so that they can make sure your account doesn’t get flagged. I’d highly recommend contacting your bank to make sure both your debit and credit cards will be usable.
Now you might find yourself wondering if bringing your local currency with you to exchange at the airport would be better. I’ll say yes and no.
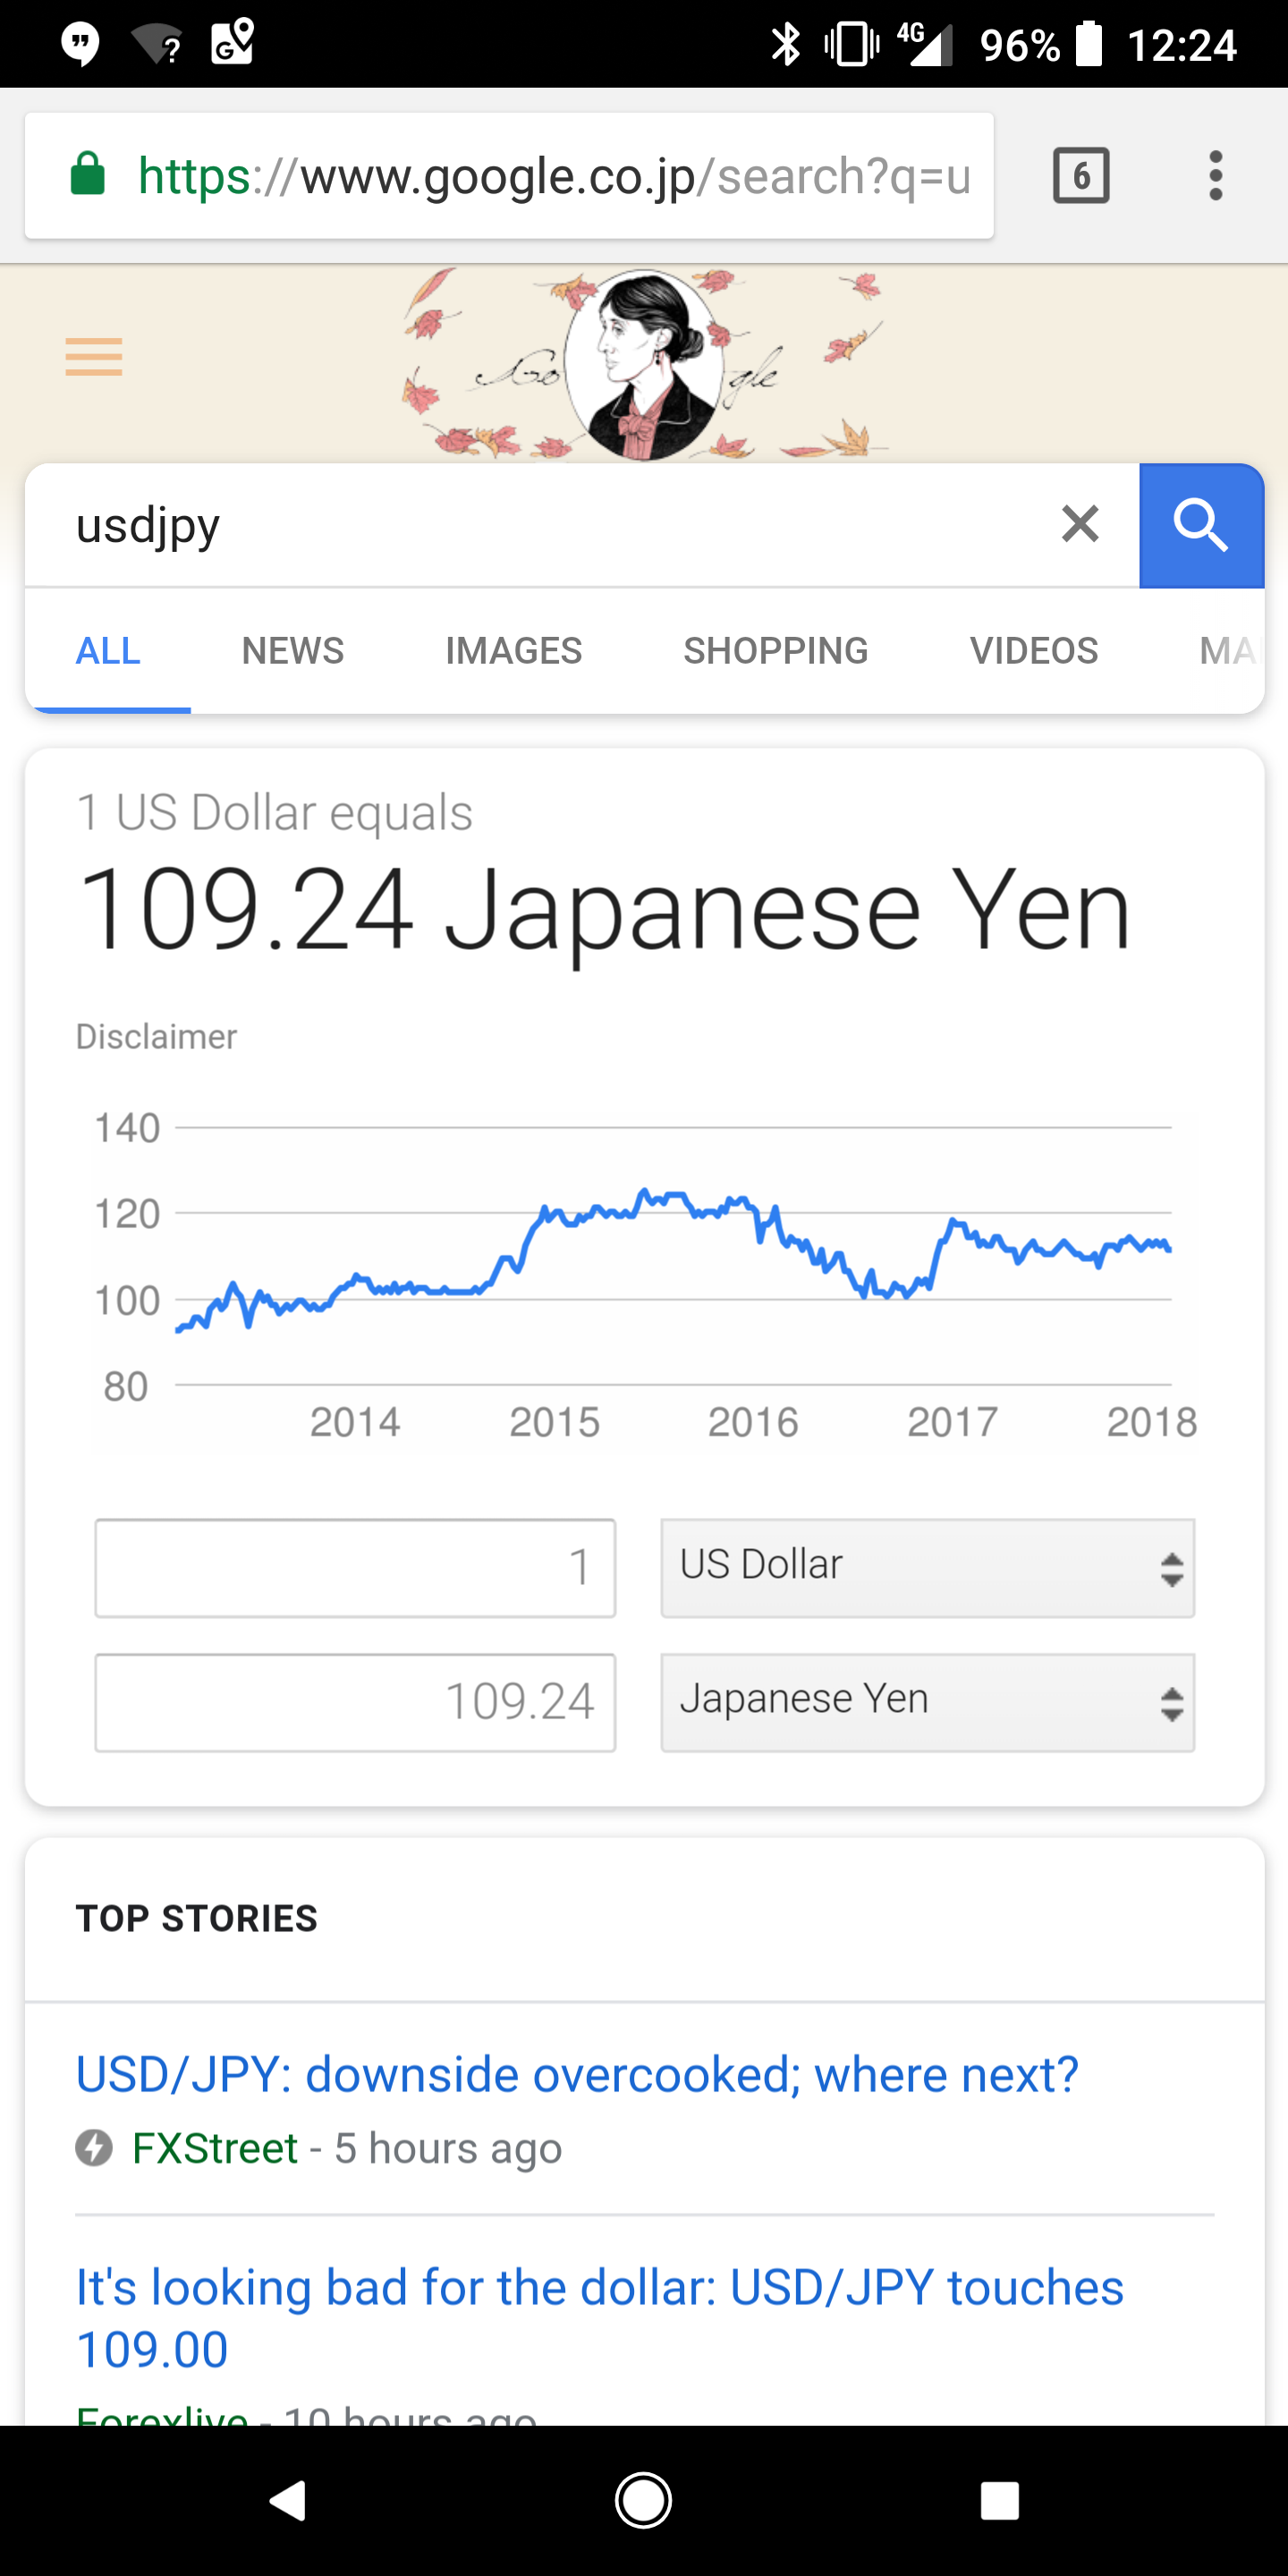
There are tons of currency exchange outlets at Haneda and Narita airports, so you should be safe exchanging there. To see if the rate they’re giving you is good, you’ll want to know the mid-market rates. This is the rate you’ll see if you Google the currency conversion you’d like, such as USD to JPY.
As the moment I recorded the video on January 25, 2018, the mid-market rate was 1 US Dollar = 109.24 Japanese Yen.
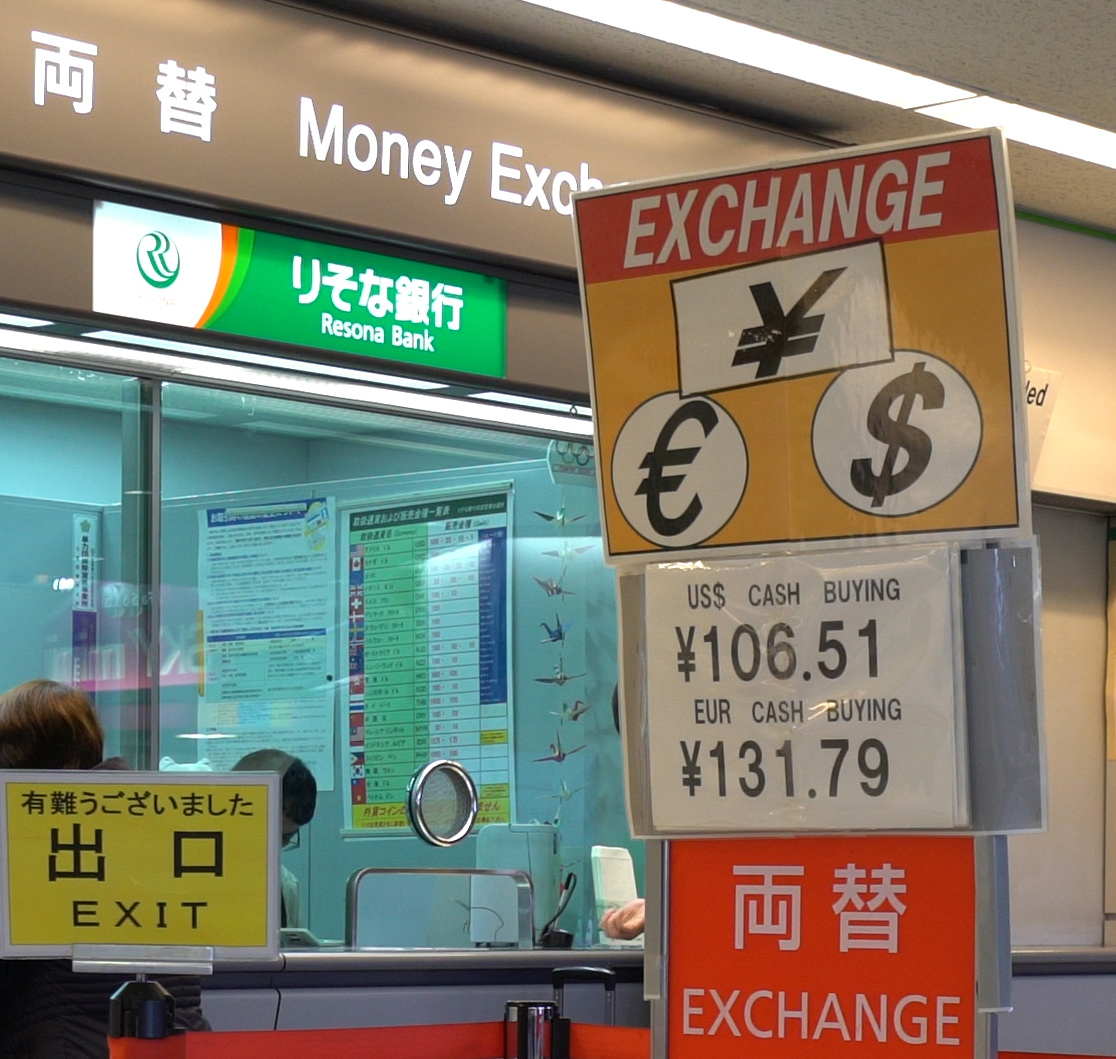
At one of the currency exchanges, the rate was 1 US Dollar = 106.51 Japanese Yen. That’s only a loss 0f 2.73 Yen per dollar, very reasonable.
But going to other outlets, the exchange rate wasn’t so favourable at 1 US Dollar = 100.61 Japanese Yen for a loss of 8.63 Yen per dollar.
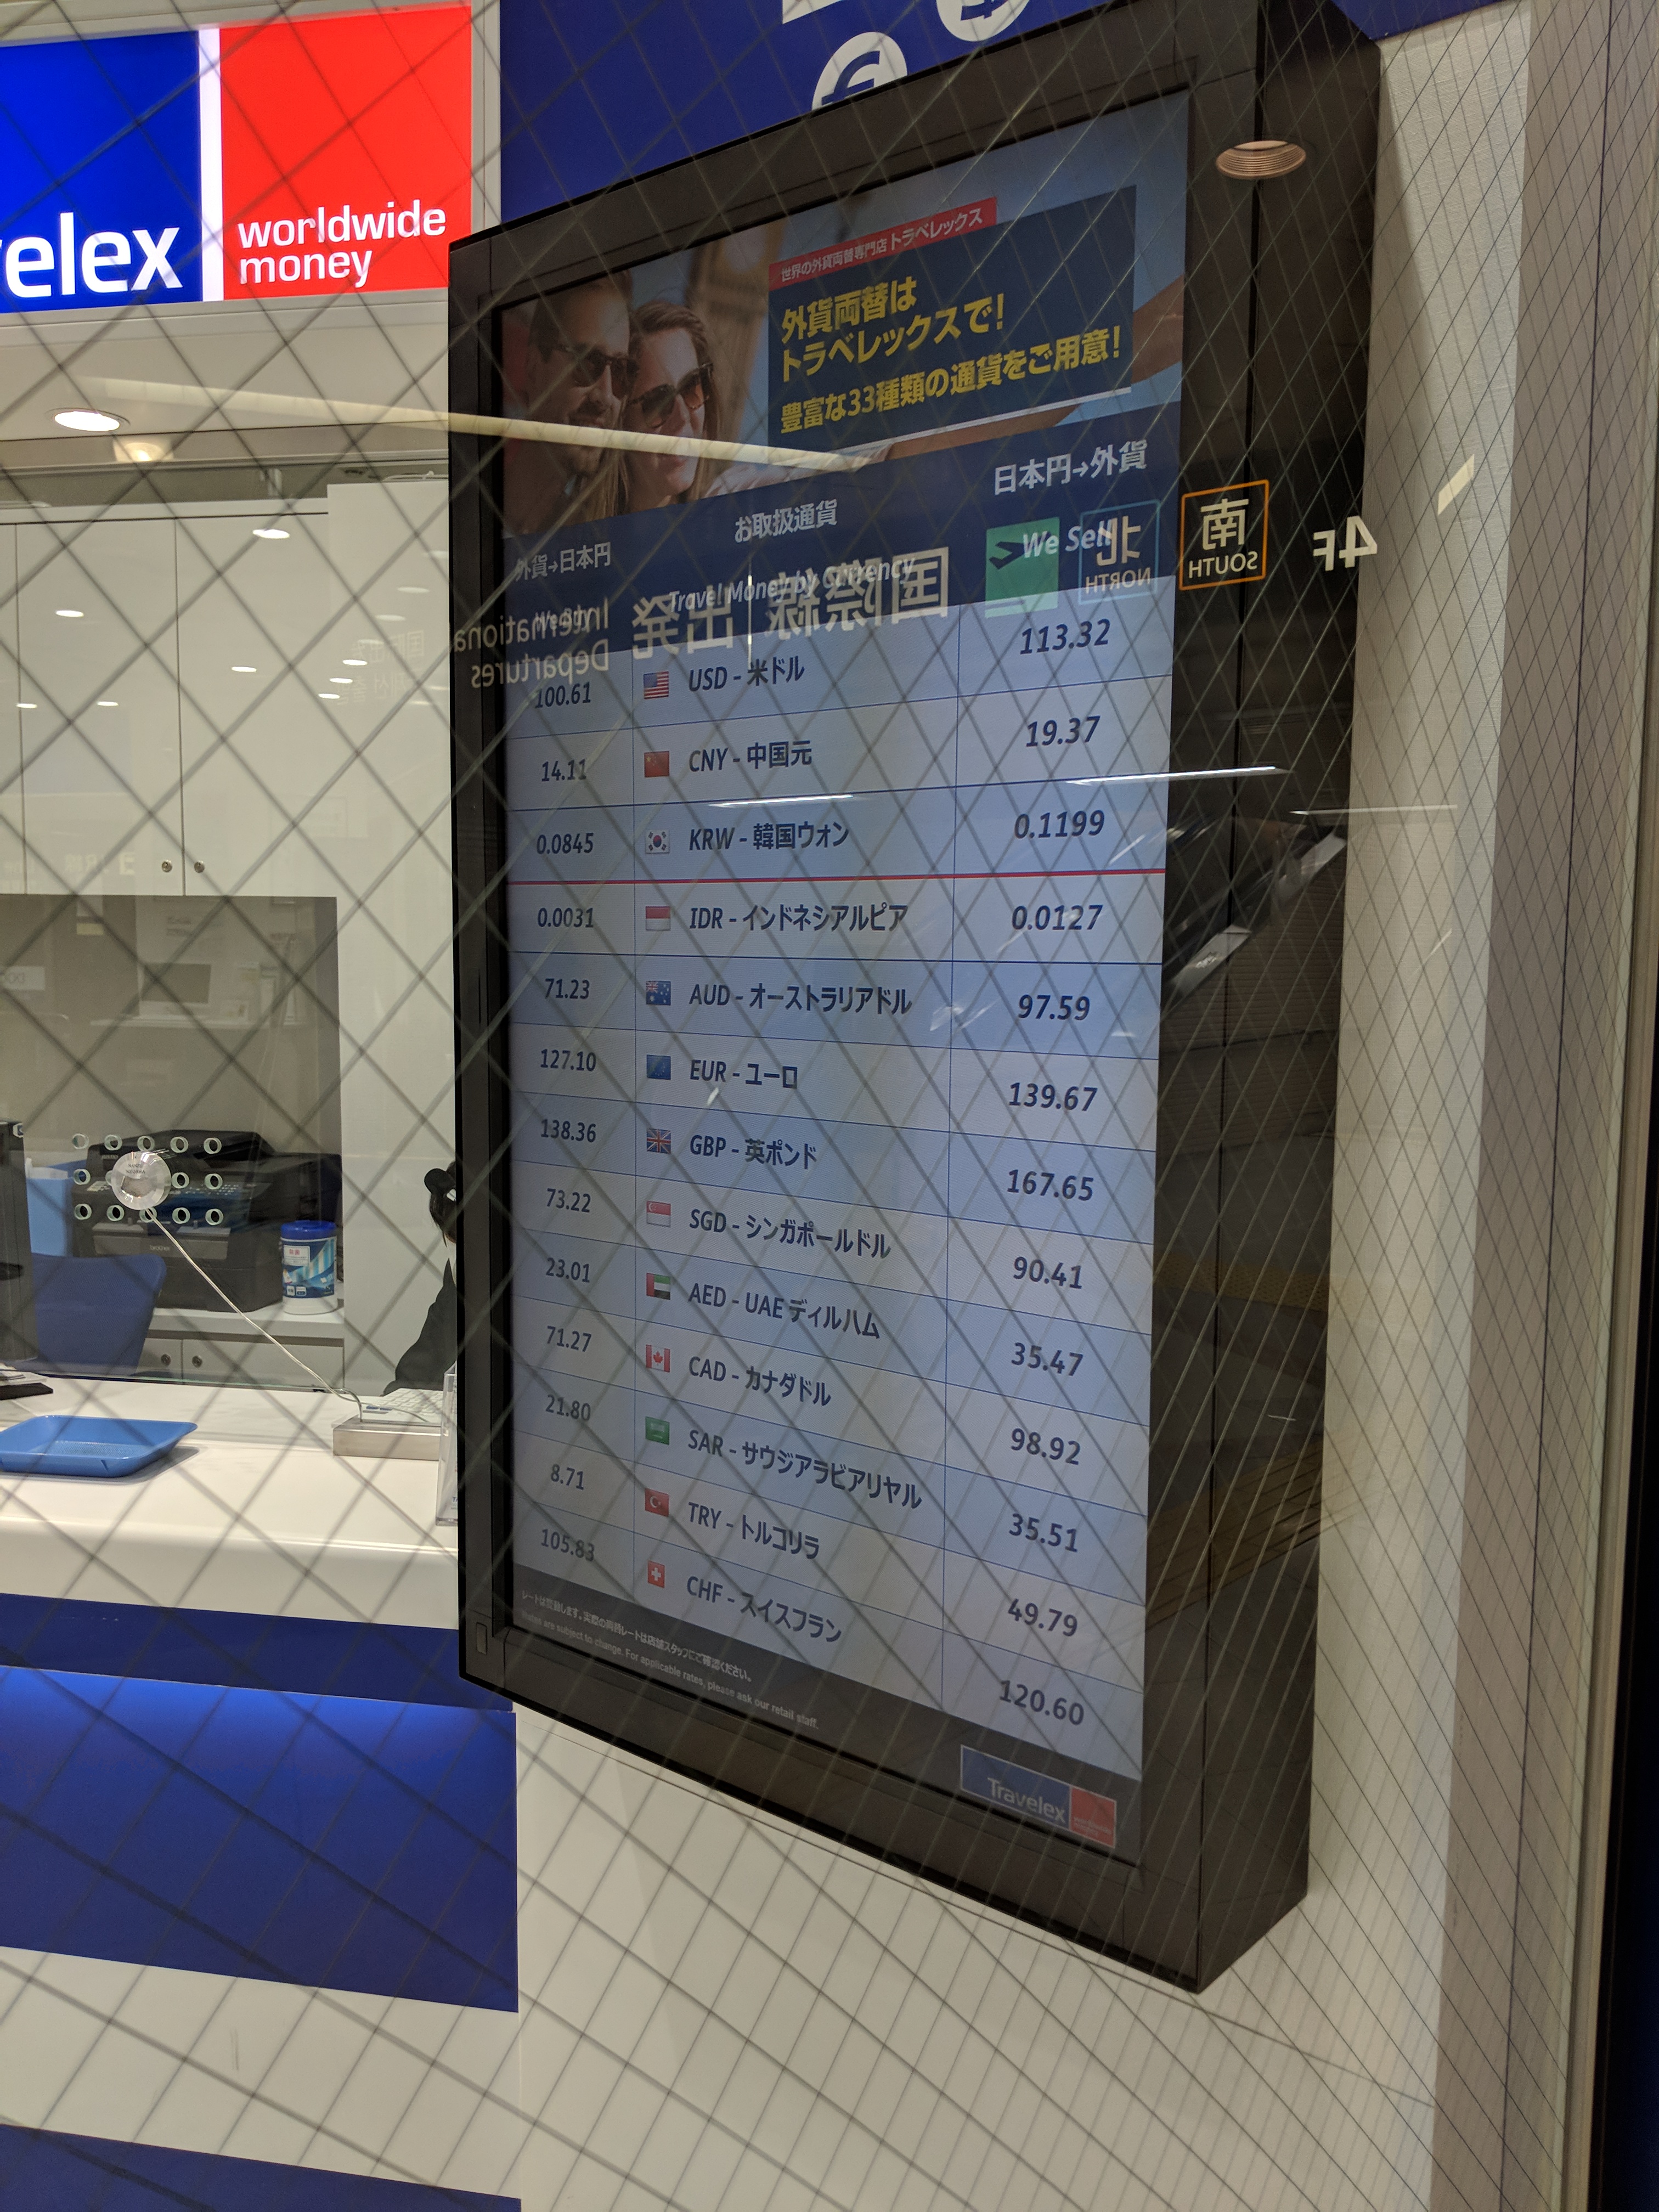
Even with the most popular currency in the world, USD, you can get some crummy exchange rates if you’re not careful. With other currencies, like CAD, you might not even be able to exchange it as it’s not as popular, or you may get an absolutely horrible rate (I’d lose 17.9 Yen per dollar at Travelex).
For Canadian banks, withdrawing money through an international ATMs will offer a fairly standard exchange rate every time, at about 2.5% above mid-market rates. They also charge a transaction fee of $5. So taking out the withdrawal limit of 10,000 JPY from a 7-Eleven ATM, it costs 2.5% for the exchange plus $5 for the fee, which roughly works out to a 3% loss.
Researching US banks, there are some, such as Charles Schwab, will allow you to have no loss on the currency exchange, while others are more similar to the Canadian bank model. So again, check with your bank
What about credit cards? If you can use one, the exchange rates can vary depending on your card, but the loss will generally be 3% or under. But withdrawing funds from an ATM using your credit will incur immediate interest, as it’s a cash advance, so you should avoid that if possible. However, if you can use it to purchase goods and services at stores, by all means, it’s an okay rate. But like I said, there are some places that won’t accept credit cards, so you’ll definitely want to have at least some cash on hand.
While I don’t recommend bringing a large amount of foreign cash to Japan in order to exchange at the airport, it’s probably not a bad idea to have a few hundred dollars in your local currency just in case something doesn’t work with your debit or credit card.
tl;dr – Use international ATMs at 7-Eleven or Japan Post to withdraw Japanese Yen, use your credit card at businesses that accept it, bring some local currency to exchange at the airport in case your cards don’t work, but call your bank a couple weeks before you travel so that you know what fees will be charged and to remove and travel restrictions.
WiFi
When you first get off the plane, you can use the free airport WiFi, which has always been solid for me. Once you step out of the airport, you’ll see free WiFi signs all over the train systems as well as around shops and other places. But don’t rely on it. For example, train systems that do provide free WiFi only do so at the station terminals. So if you’re actively riding a train, the only chance you’ll have to connect to the WiFi is at the stops. But the stops are so short, that by the time you connect, you’ll be disconnected.
If you’re one of those people who are relying on your phone as a lifeline, then you’ll want to rent a mobile pocket WiFi.
My tried and true trusted source of Wifi is Global Advanced Communications. This is what my family and I have personally used for over 5 years without any issues.
That being said, some nice Internet person has made a complete comparison site.
Here’s a few pointers:
- Unlimited data is not really unlimited. Depending on the plan you use, this could mean a generous max of 5GB a day, or it could mean less. After that max, you have data, but the speeds are throttled hard. So hard, that even looking up directions in Google Maps can time out. It’s fairly unusable, except for perhaps text messaging. Even with the Super Premium WiFi packages, try and save your video watching to when you’re at non-metered free WiFi, like at you accommodation.
- If you’re going to really rural or mountainous areas, you may need to go with a plan that has wider coverage. But for example, I used the Standard WiFi package of Global Advanced Communications, traveled for 2 weeks around Japan with my little brother, even down to the little island of Amami-Oshima, and I didn’t have any connection issues. So it’s probably only a problem if you’re really going off the beaten path, or maybe going to some northern ski resorts.
- Last thing, notice that I recommend mobile WiFi and not the sim card. Mobile WiFi is a virtually dummy proof way of doing things. There will be no compatibility issues, but more importantly, you can share your data with travel companions. If you know what you’re doing and want a phone sim card, then ignore what I just said.
With a lot of the pocket WiFi providers, you can either pick up the device from the airport or have them shipped to your accommodation. For returning, you can either mail it in (with a mailer that’s provided for free) or drop it off at the airport.
Bodily Functions
People often ask me about what culture shock I had when going to Japan for the first time. Probably one of the biggest ones was that soap and dryers (or paper towels) were not standard in Japanese bathrooms. If you’re in an airport, hotel, or restaurant, you can usually find them, but out and about at train stations or other public washrooms, good luck!
It’s for this reason that I recommend picking up some hand sanitizer or anti-bacterial wipes; and even a small hand towel. They go by many names in Japan, so I’ll provide you with a ones that should work
- Hand sanitizer = 手の消毒
- Anti-bacterial wipe = 除菌ウェットティシュー
- Hand towel = ハンカチ

On the left side, that’s hand sanitizer. The brand name is 手ピカジェル. I’ve seen this is many places, so look for that little raccoon. The pink one is standard while the yellow one offers virus protection, or in other words, is stronger and less mild on your hands.
On the right side you have anti-bacterial wipes. The brand name is キレイキレイウェットシート. It literally means clean, beautiful wet sheet. The pink one is non-alcohol based (which they market as being safe to wipe your mouth), while the green one is alcohol based.
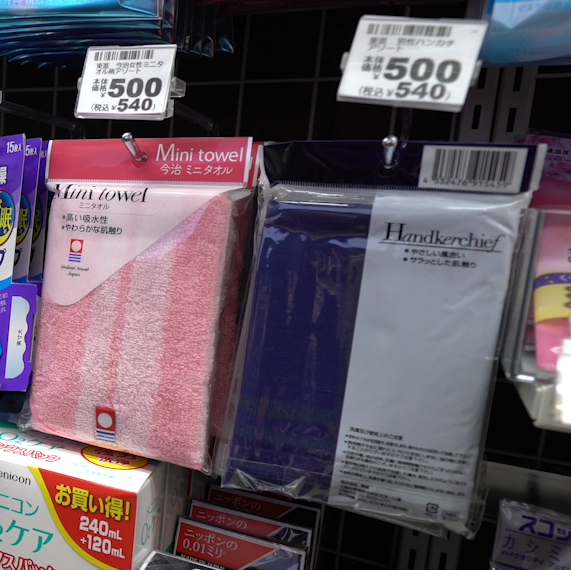
Above you’ll find the hand towels. which it at least pretty easy to visually pick out. They go by the names of hand towel or handkerchief. If you’re lucky, they’ll even have it written in English. In Japanese, they’ll be named タオル (towel) or ハンカチ (handkerchief).
Water
What you can find all throughout Japan is fresh, clean, water. Nearly all public parks will have a water fountain, and parks are plentiful.
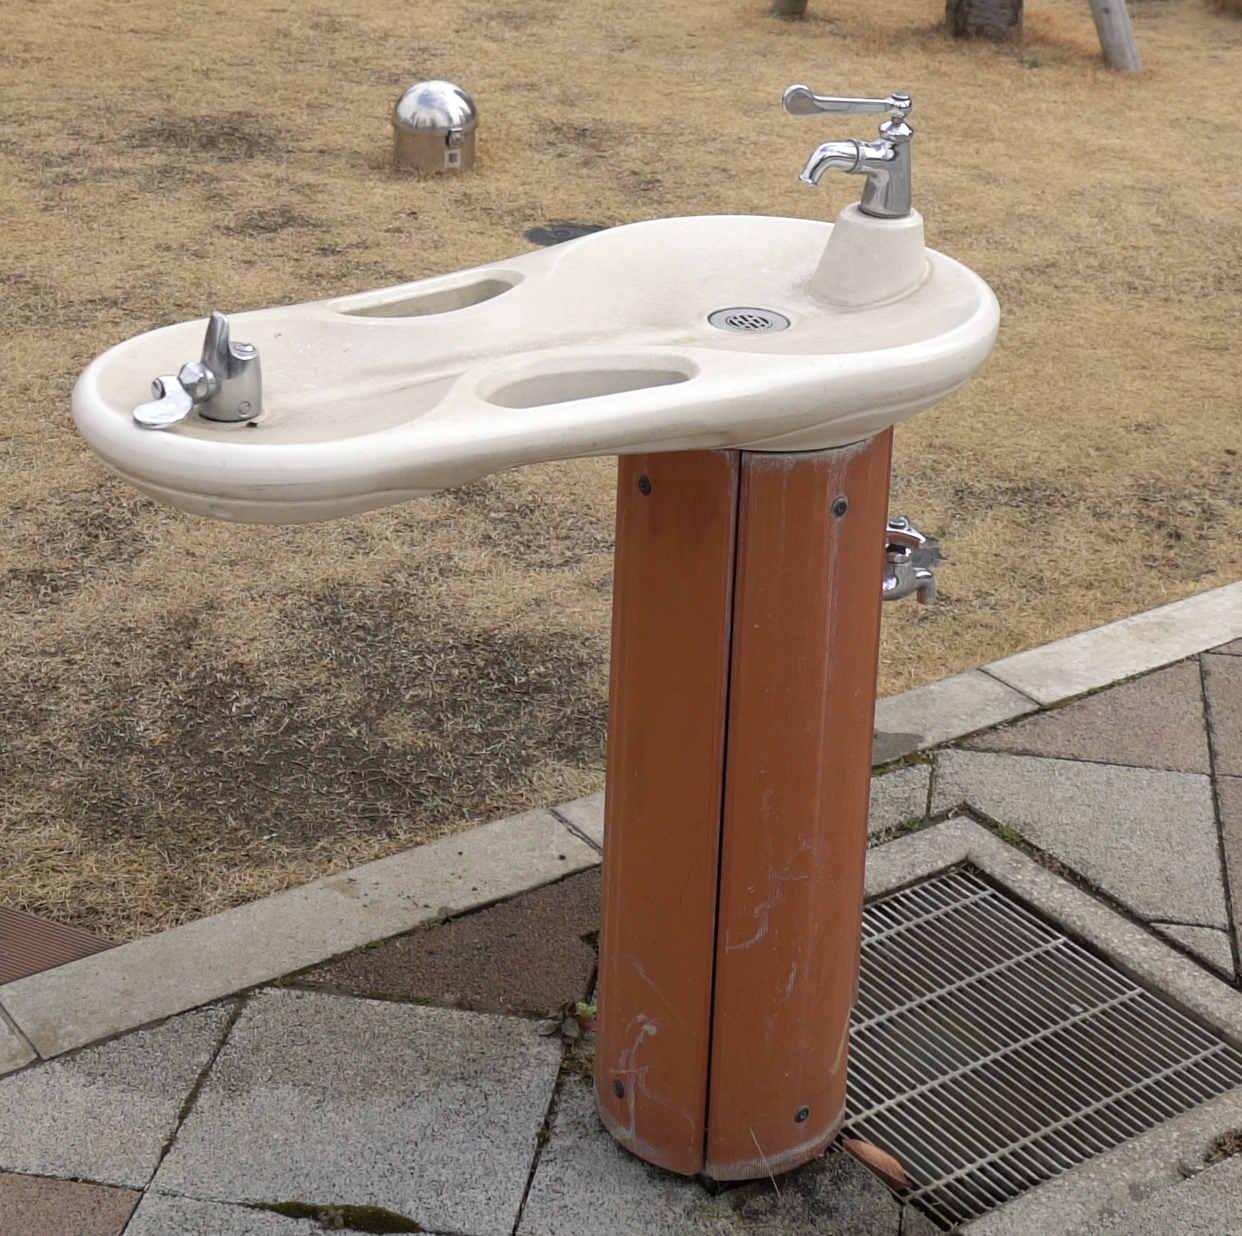
My family has personally visited a couple water water purification plants (including the Tokyo Water Science Museum), and we can vouch for the fact that it tastes good as well.
If you can’t find a water fountain though, you’d have a difficult time not finding a vending machine, they are everywhere!
Public Transportation
Japan’s public transportation is excellent. They’re clean, go virtually everywhere, and are almost always on time. So you’ll have no problem getting out of the airport. There are many different ways you can do so, via taxi, buses, or special trains, but what I’ve always done with my family is simply catch the regular trains. And when it comes to riding trains or buses, using an IC card is your best bet. It automatically calculates fares, so you don’t need to calculate and buy a ticket for each trip.
The two IC cards you can get in Tokyo are Suica and Pasmo, but they work on virtually all transportation networks in Japan (which is true for any IC card you’ll get). There are some exceptions though.
Getting an IC card
There are English instructions for getting an IC card on the machine, so I won’t post a step-by-step process here (plus, you can watch the video of me going through the screens if you really need to).
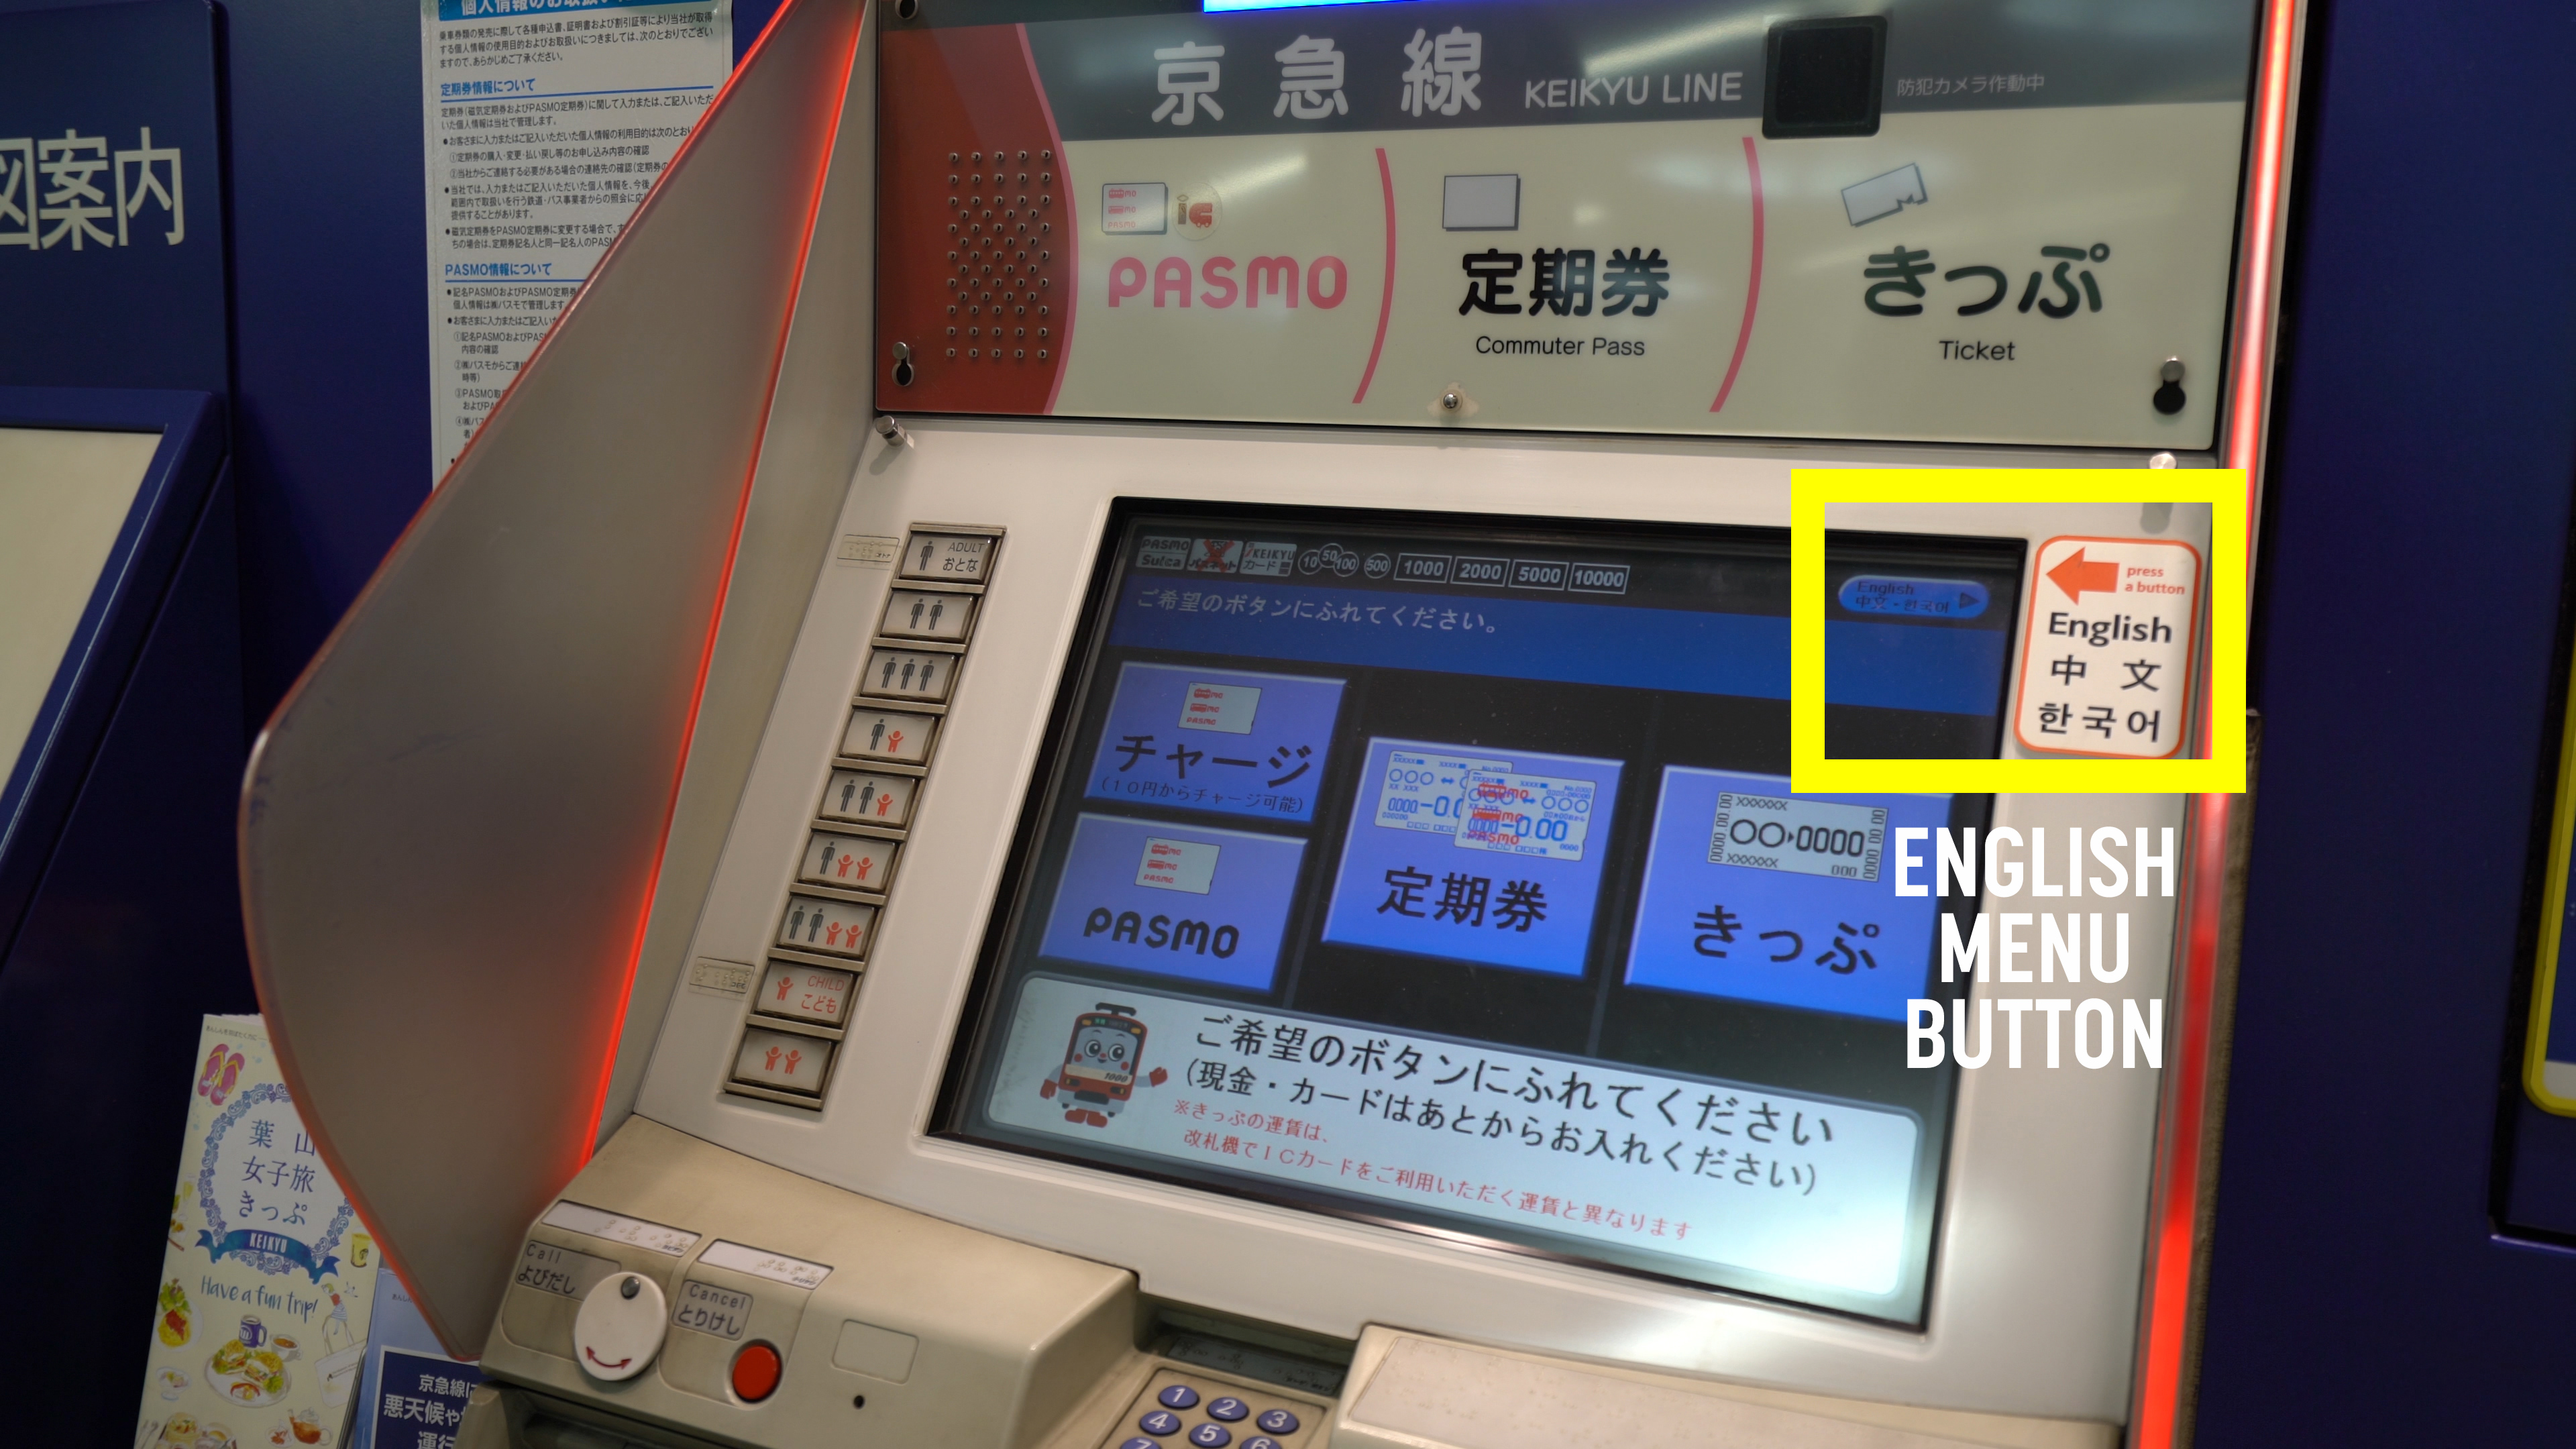
But, I will point out a few things:
- You probably can’t get a named card, as you’ll need a local phone number (but if you do have one, it’s great, because if you ever lose your card you can get all the funds back, minus a 500 JPY fee.)
- You will get the complete balance of your card plus the 500 JPY deposit if you return your card to the ticket attendant at the end of the trip. So I wouldn’t worry too much about trying to put the exact amount of funds you need on the card.
Japan Rail
If you’re going to multiple cities/areas, you may want to consider the Japan Rail Pass. It doesn’t get you on all trains in Japan, but rather most offerings of the Japan Railways (JR) Group. For example, if you’re traveling from Tokyo to Kyoto, this’ll be more affordable than buying individual shinkansen (bullet train) tickets. The only catch is that you need to buy this pass before you arrive in Japan, so make sure to buy it in advance.
This pass will not cover all trains/buses in Japan, so I’d still recommend getting an IC card.
Special Passes
While the IC card will generally be the easiest option and you’ll even save a tiny bit of money on some fares, if you plan on travelling heavily in a single area for set period of time like one or two days, there are some special passes you can get that could save you a lot. For example, when my family went to Hakone, we got the Hakone Freepass, which let us use their entire transportation network as much as we wanted, from trains, to gondolas, to pirate ships (yes, you read that write, we went on a pirate ship).
Google Maps (and Google Translate)
While getting an IC card makes travelling easy, figuring out how to get there can be extremely daunting. Reading the local maps gives even seasoned locals a pause. Luckily, Google Maps does an excellent job of figuring out routes, from transfers to prices. It won’t be 100% all the time, but I’ve used it to travel all around Japan for numerous years without any major issues.
One thing to note though, is that the connections given assume you know where to go when transferring. So there’s an almost 100% chance that you’ll miss a connection during your trip, it happens to the best of us. In this case, simply use Google Maps to recalculate your route. This is why I also recommend a pocket WiFi, as I’ve had to plan trips out while riding on the train, where you can’t access free station WiFi.
UPDATE: Many in the community have recommended Hyperdia. You’ll need to know the name of the stations you’re going to, but it gives you better control over the modes of transports and helps you figure out routes if you have special passes, like the Japan Rail pass and want to only use that.
I’ve made a video poking some fun at Google Translate, but it can actually come in handy. Here’s some tips on how to use the various functions.
- If you’re going to use the speech translation between you and someone speaking Japanese, make sure to manually select the language spoken, instead of having it auto-detect. Way less errors this way.
- Taking pictures for translation of Japanese text (hiragana, katakana, and Kanji) can be hit and miss. Sometimes it’s deadly accurate, other times it’ll be hilariously wrong. It can be handy when looking at signs.
- Hand writing in Japanese text is by far the most accurate. The app is fairly forgiving of bad handwriting (I would know, I have horrible handwriting).
If you want to ensure the least amount of potential errors, keep the sentences simple and straightforward. The shorter the better.
Relaxation
If you’ve watched a few of our videos, you may have clued in to the fact that I absolutely love onsens and sentos (hot springs and public baths). I even made a whole video about bathing in Japan. I’ve had a few family members visit, and they’ve loved it just as much as me. So, I’ve now had a policy to take visitors there on their first day, to relieve all that stress from the travel. If you’re coming from Narita, I’d recommend 真名井の湯 千葉ニュータウン店. Google Maps translates it as Hot Water of Mana Well Chiba Town, in case you’re searching for it there. I recommend it because you don’t need to do any transfers, it’s close by, clean, and they have real hot spring water (not all public baths have real hot spring water).
Here’s the ticket machine, and here’s the counter where you’d give the ticket to the staff and collect your towels.
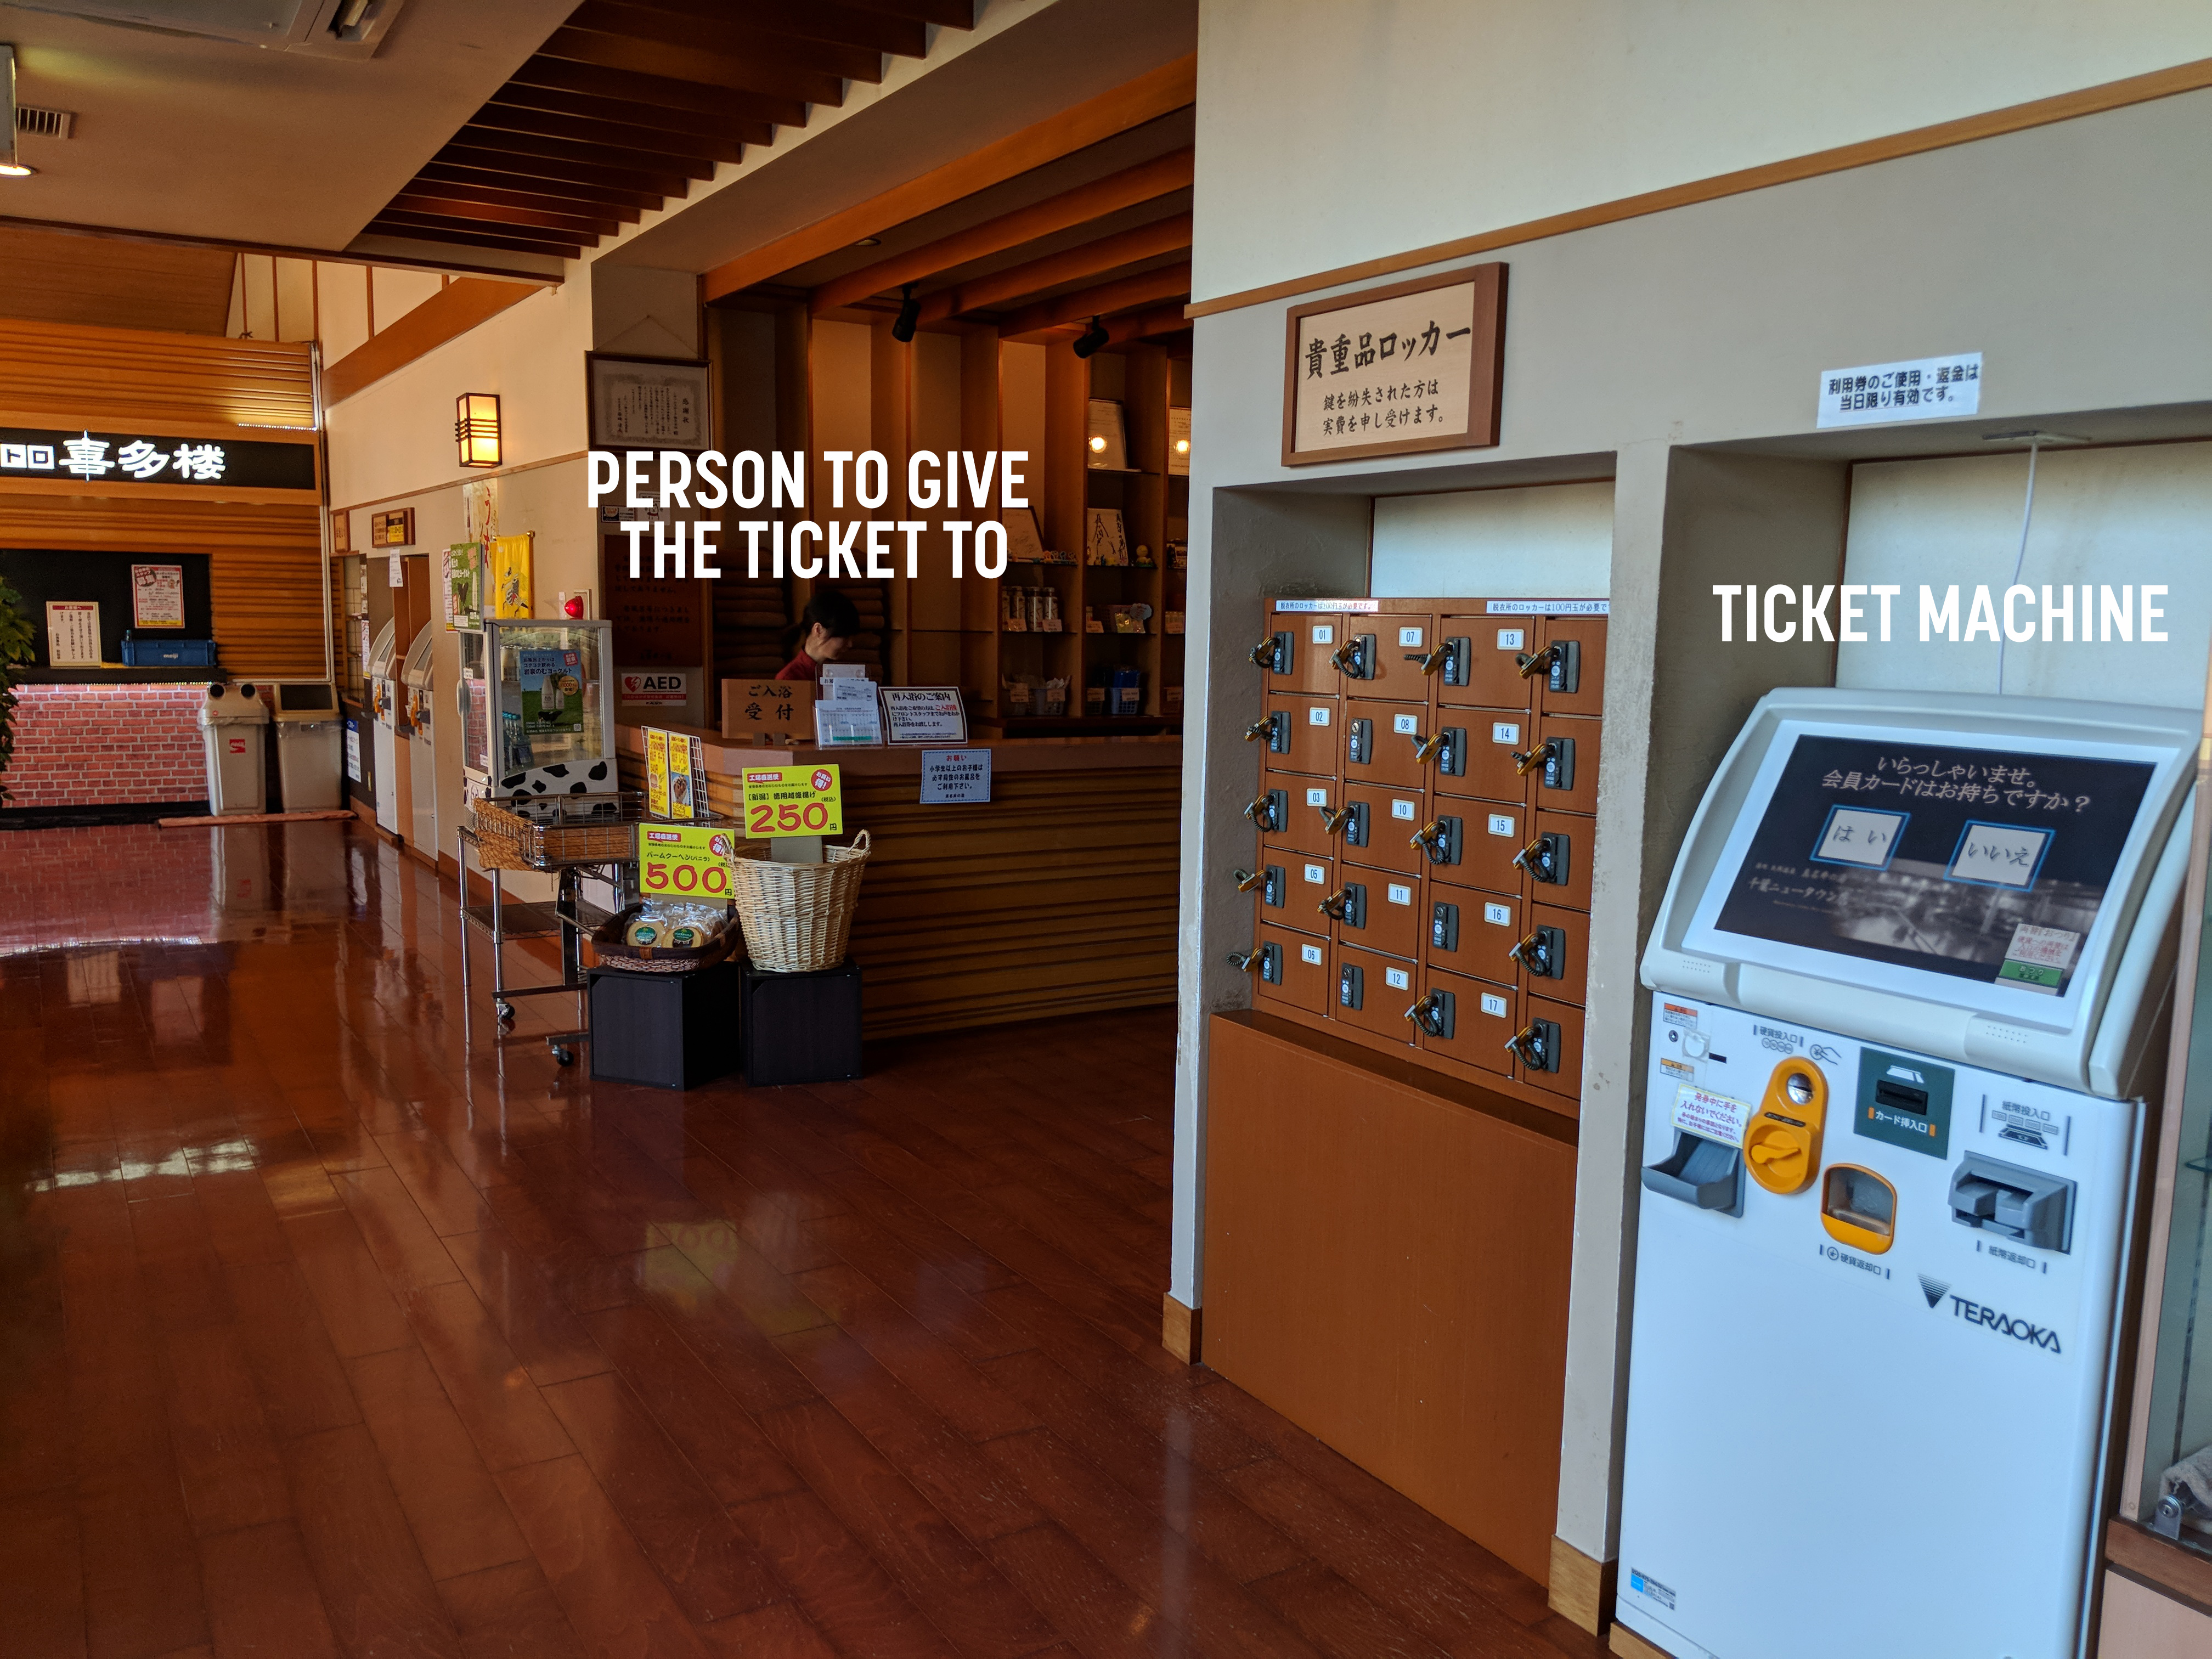
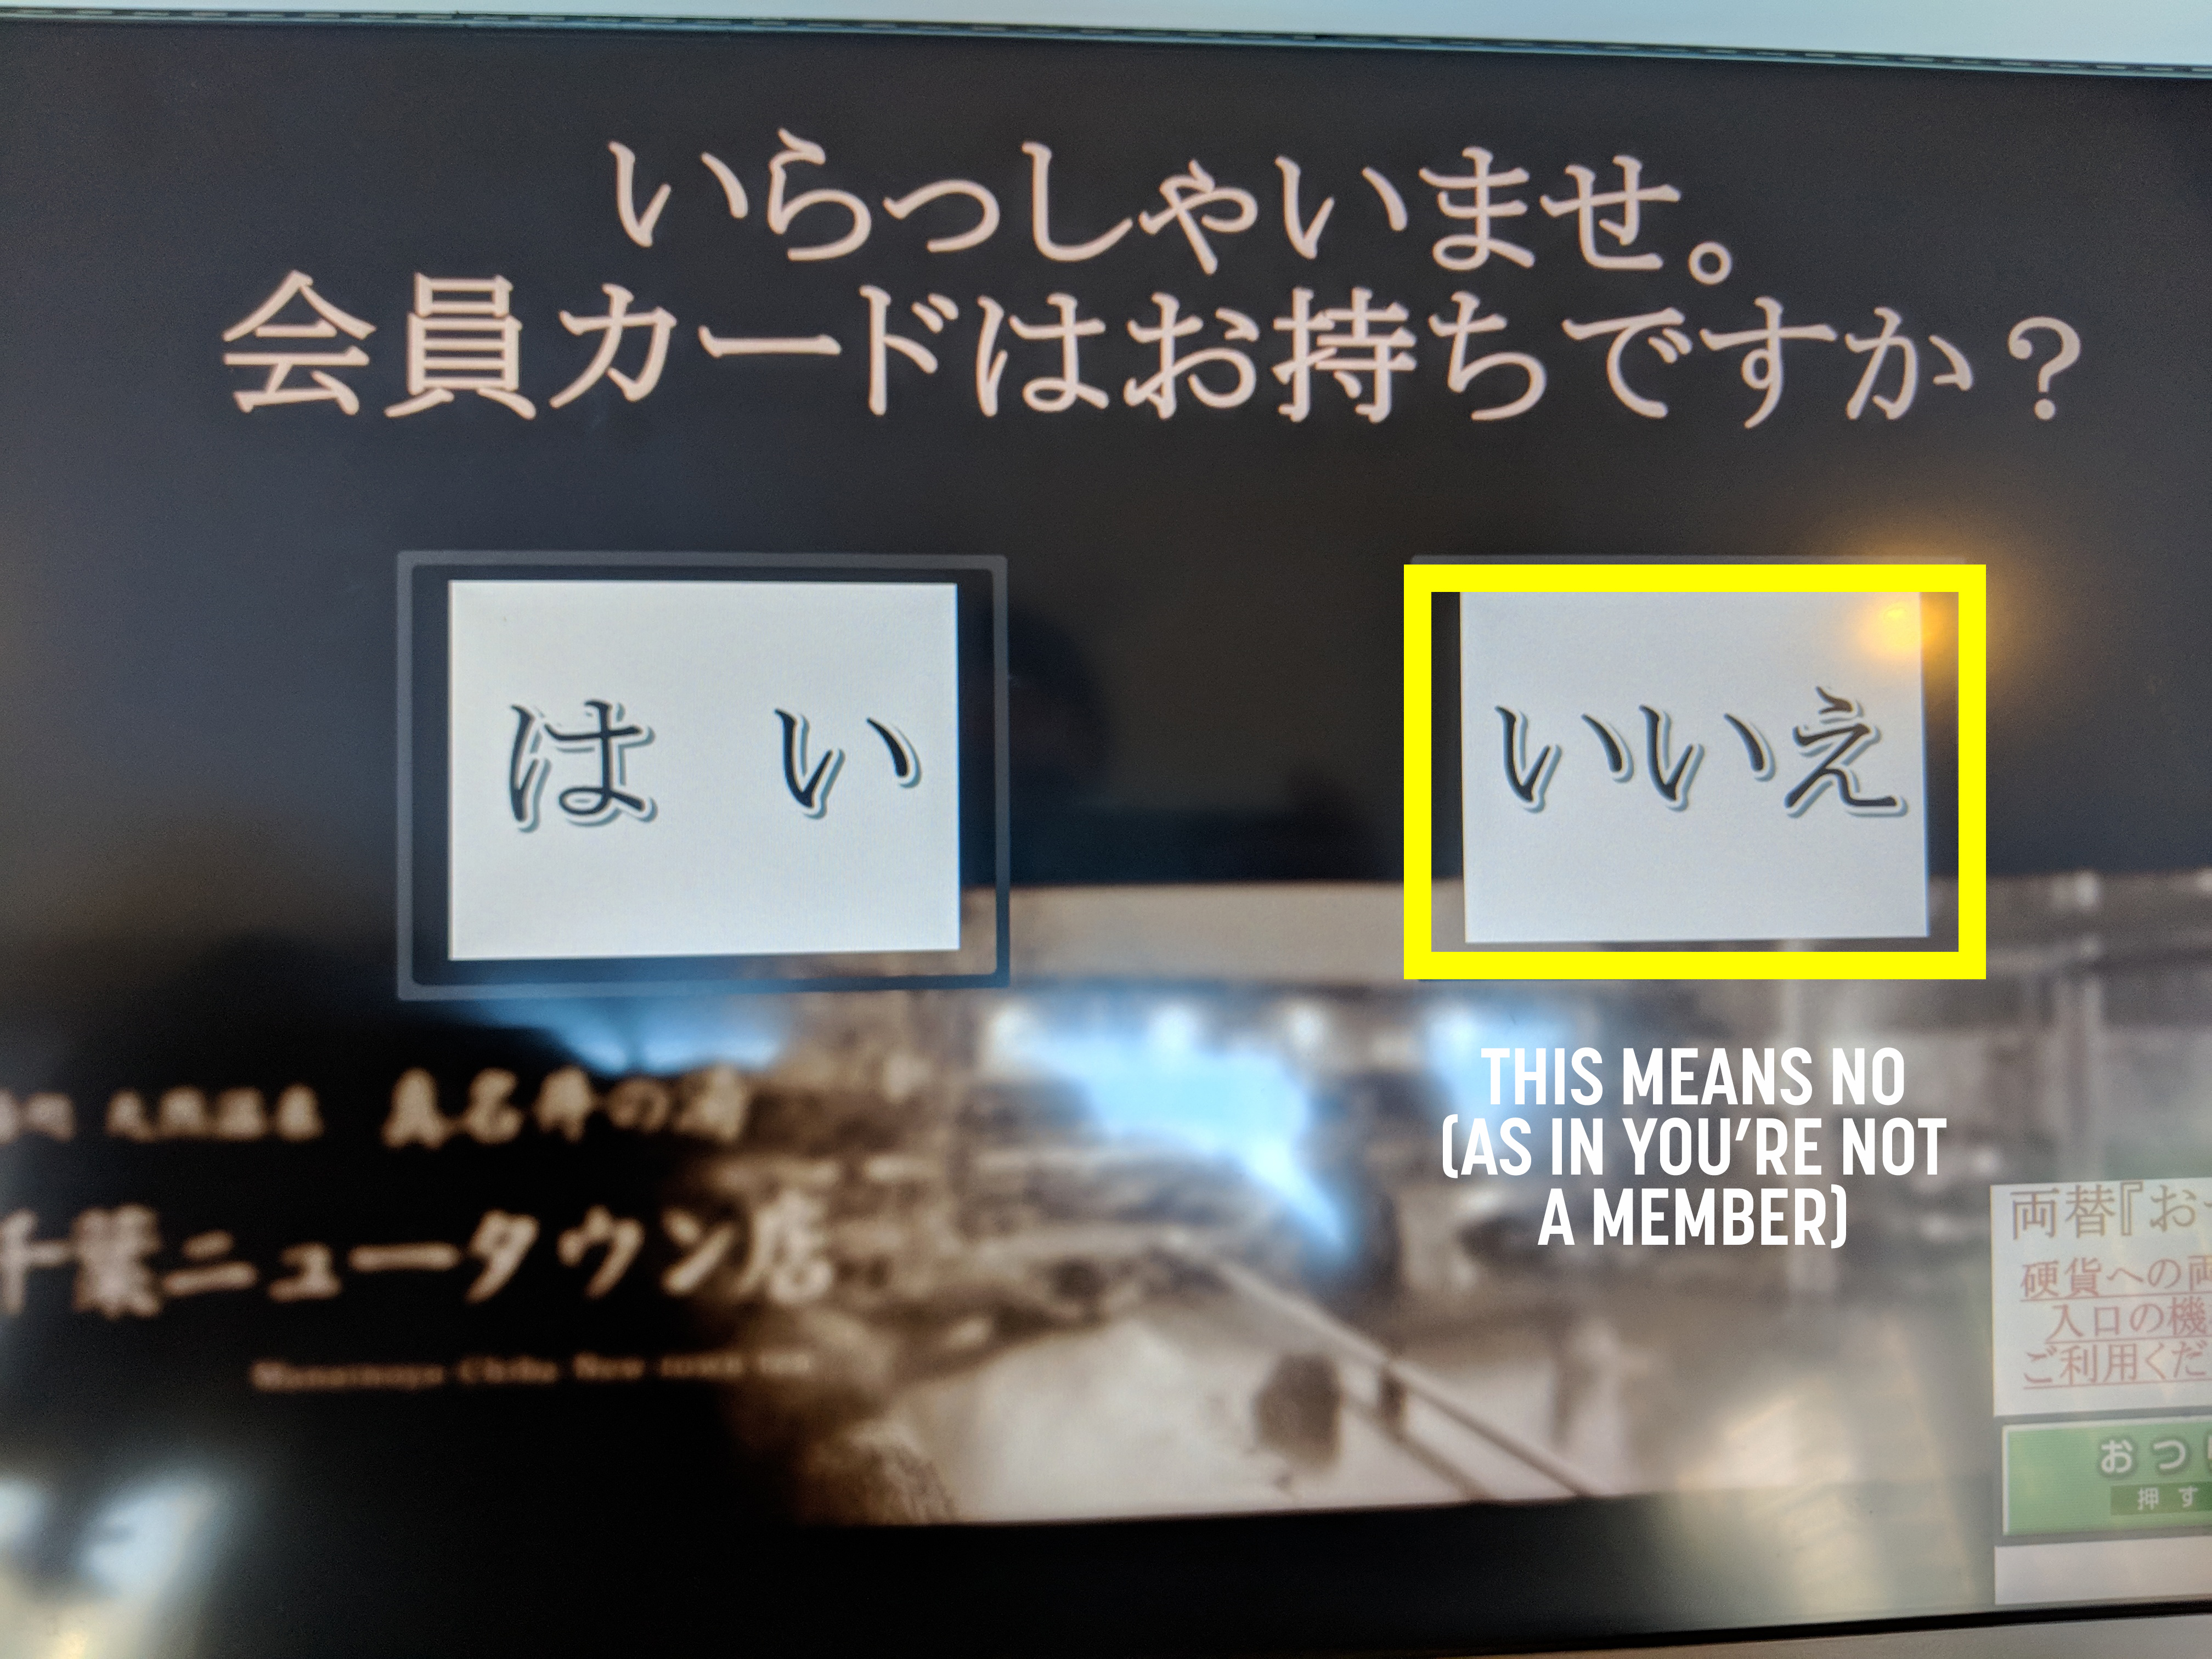
Since the ticket machines are all in Japanese, I took screenshots (with the permission of the staff), so that I could show you what to do.
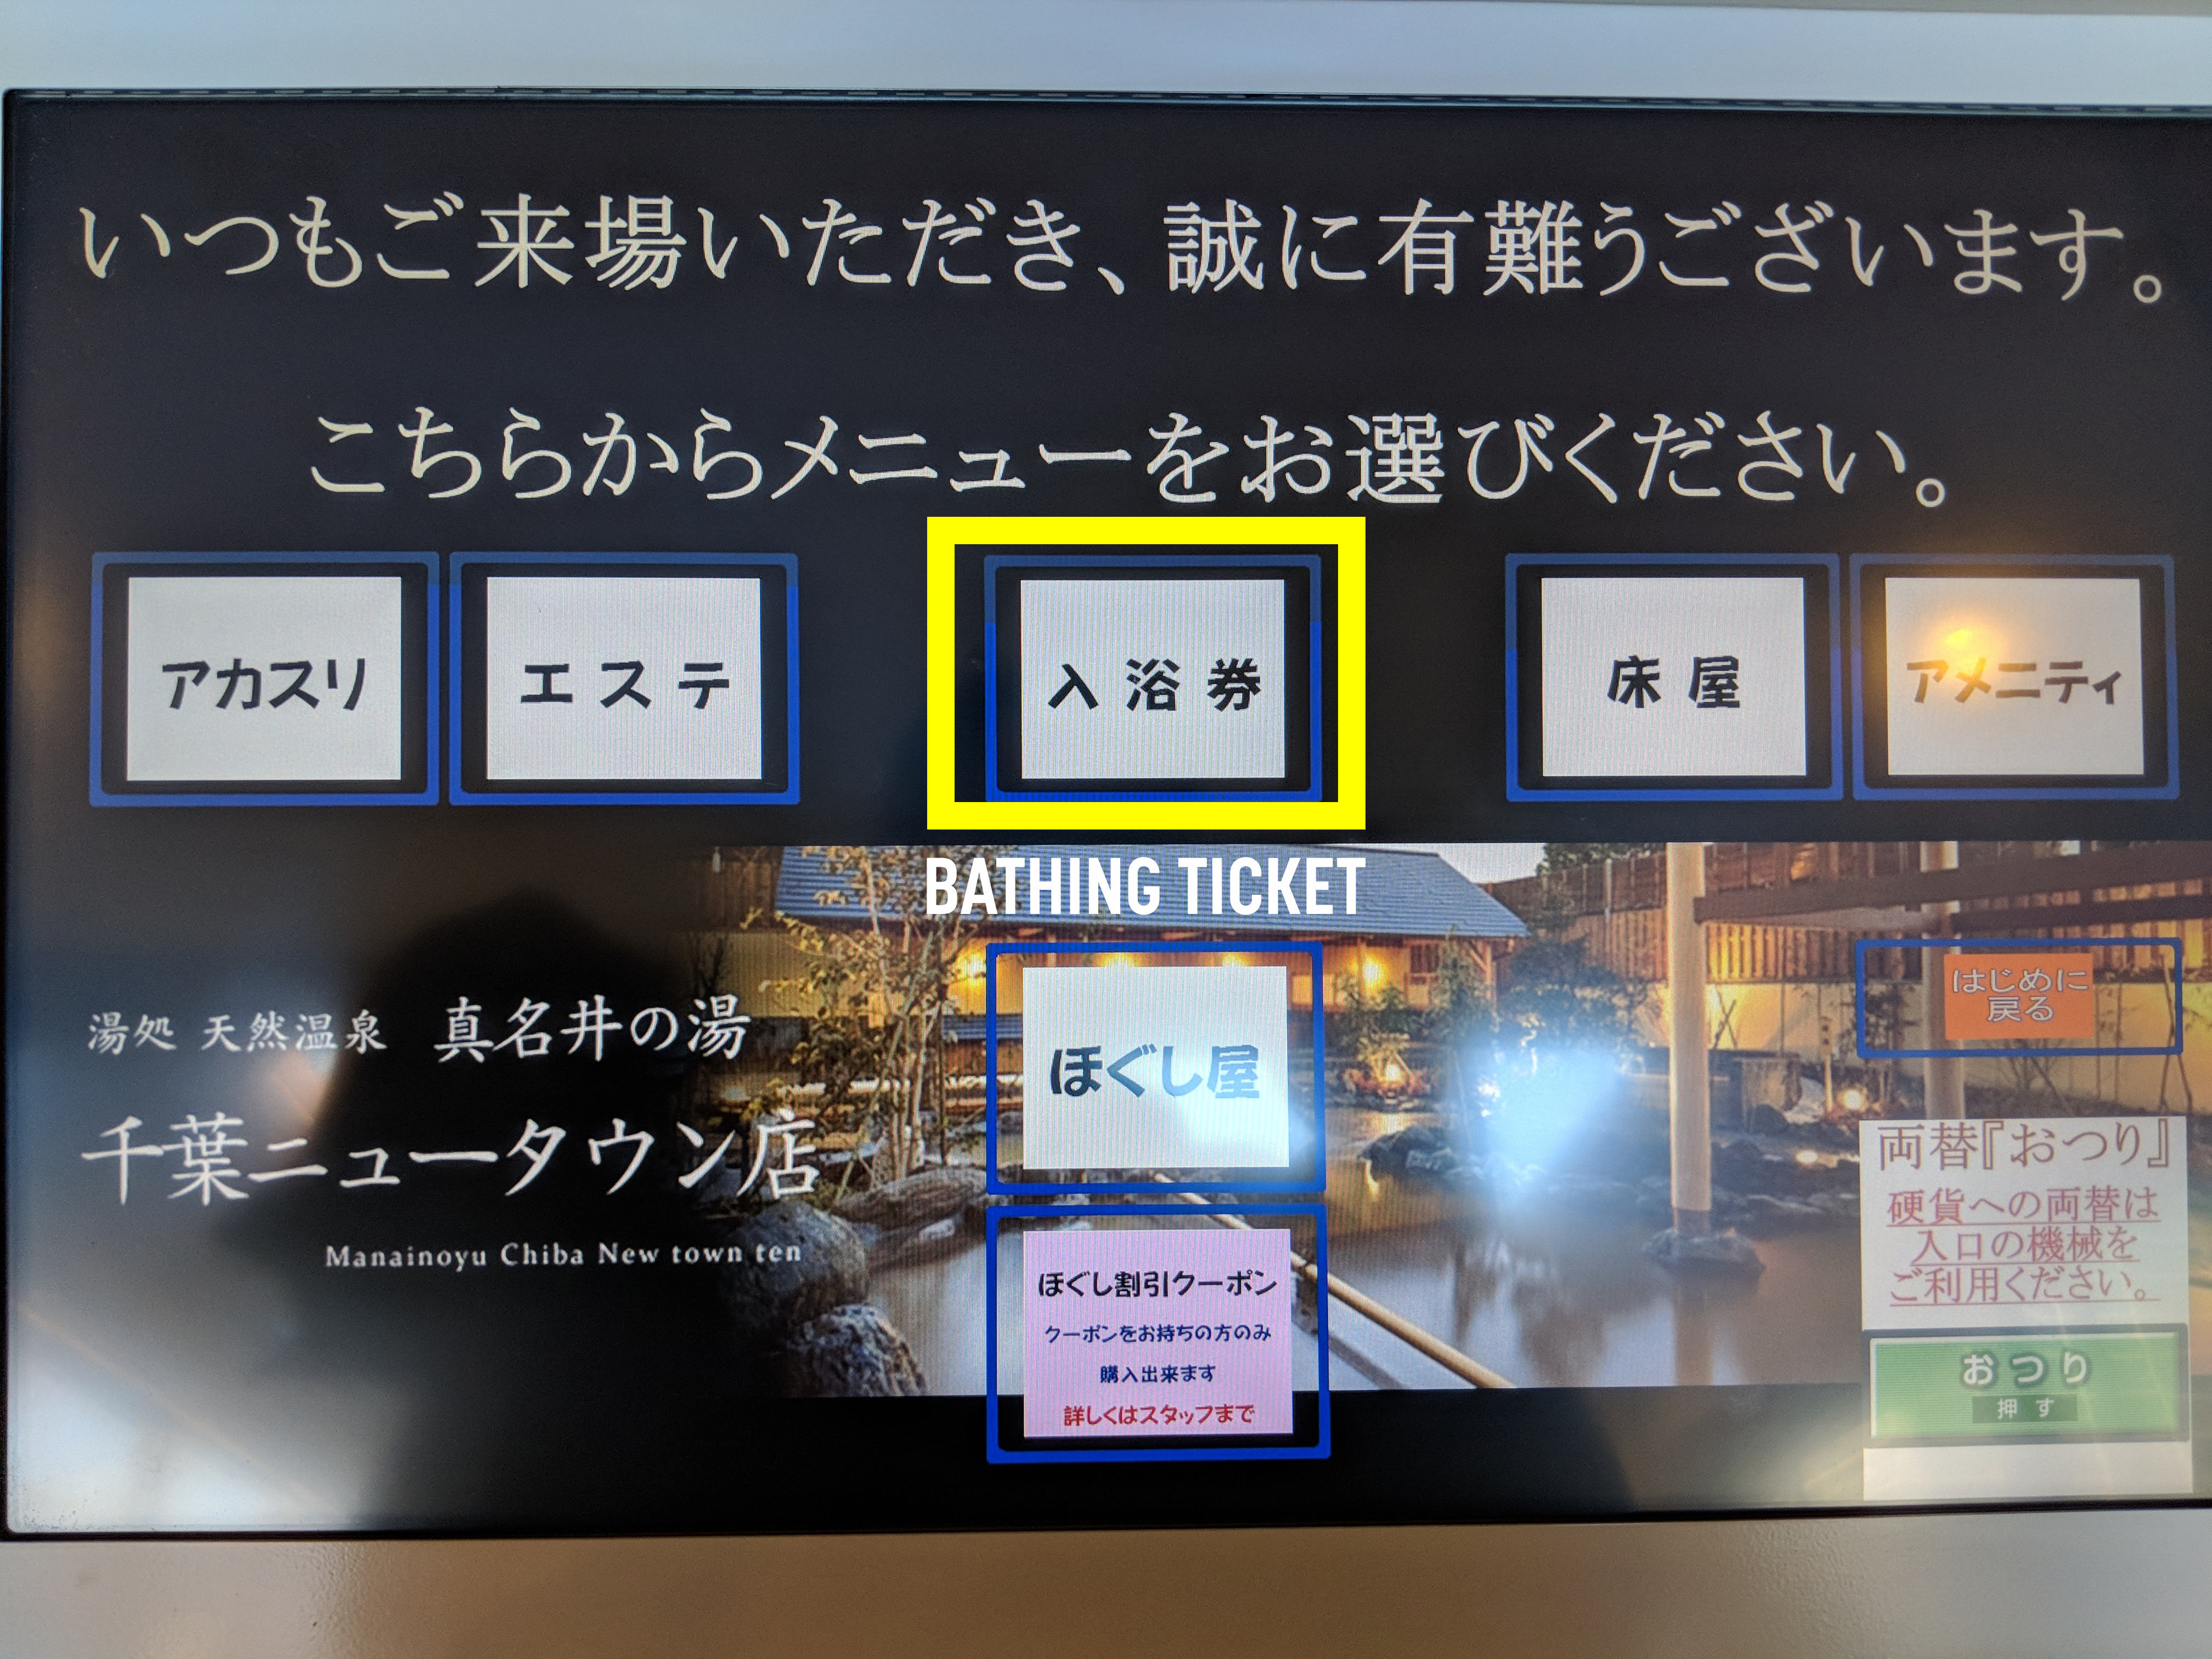
This screen is asking if you’re a member or not. You are not, so you hit いいえ.
This one is asking what you want, you want a bathing ticket 入浴券.
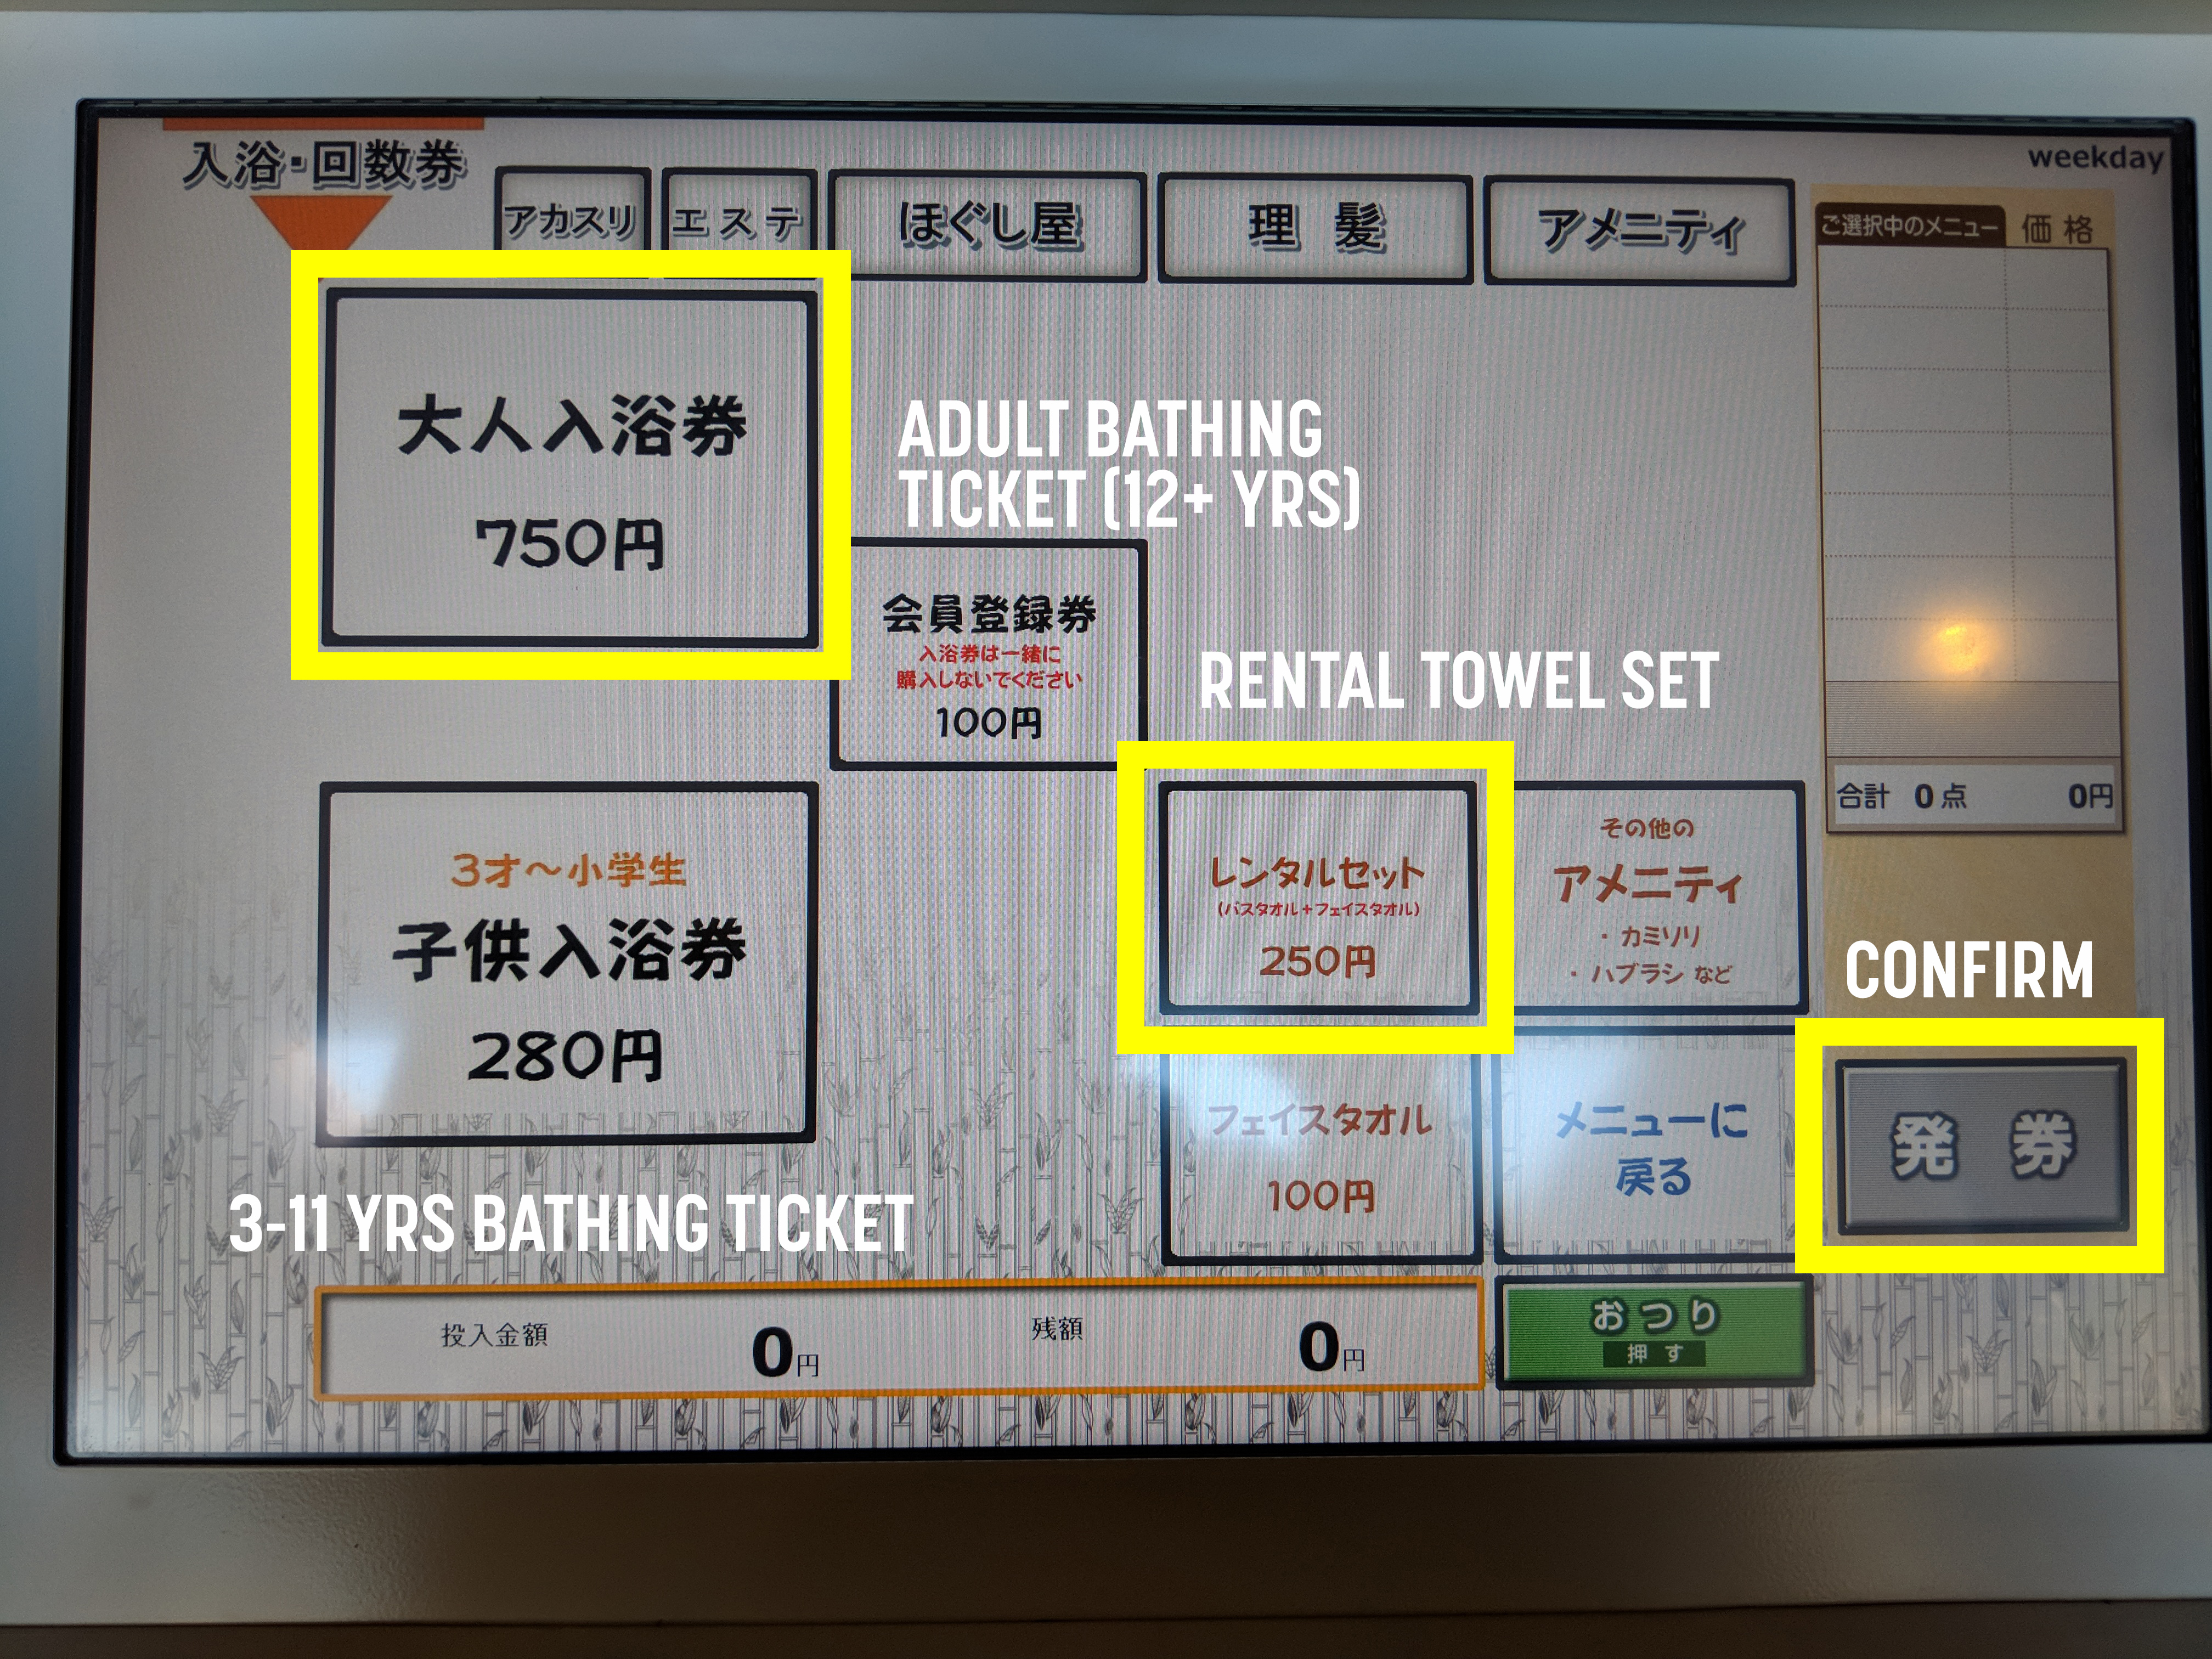
This screen is asking what kind of ticket. The 750円 option is for an adult ticket (12 years and over). The 250円 option is for a rental towel set (both face cloth and regular-sized drying towel). Put your money in and then hit 発券, which will confirm your purchase. If you have kids, between 3 and 11, you would press the 280円 option. Under 3 is free. Also, many places have a rule that under 120cm, either gender can enter the male or female side. So if you have young kids that haven’t entered grade 1 yet, they can bathe with either parent/guardian.
If you have any big luggage, you can also give it to the staff and they’ll hold it for you. IMPORTANT NOTE: The reason you take off shoes when entering many buildings in Japan is to separate the dirty from the clean. Your luggage has been rolling around in dirty areas, so I’d recommend against rolling it around the sento. Instead, pick it up and carry it.
I did talk to the staff and they don’t seem to know much English. However, I figured out if you ask for BATH and TOWEL in English, they should be able to figure out enough to lead you to the machine and guide you through.
If you look at the picture closely, you’ll notice there’s another set of ticket machines to the left of the reception. That’s for buying food and it’s also in Japanese. It has the same “are you a member or not question”, so you’d press いいえ. Besides that, you can tap on things and they’ll show visual pictures of many of the items. After that, you need to put in your money and press the confirm button 発券.
Now, what do you do once you’re in the bathing area. My friend Jess of Notes of Nomads has a video covering this for you.
Phrases
I won’t teach you a whole bunch of Japanese, you can do all this without knowing any, but I did want to teach you one word, すみません or すいません (sumimasen or suimasen). Depending on the context, it means excuse me, sorry, or thank you. So you want to get someone’s attention, say sumimasen. Someone helped you, say sumimasen. You accidentally bumped into someone, say sumimasen.
For a guide to useful beginner Japanese phrases, I recommend this video from Japanesepod101.com.
Questions/Comments?
There’s no way I covered everything, and I’m sure I made some mistakes, but I trust this gives you a good introduction to surviving the first hour of your trip in Japan. If you do have suggestions for me, probably the most sure fire way to reach me is at greg@lifewhereimfrom.com. I can’t promise to answer any questions in any timely manner, or at all (I do get a lot of questions), but I will try and incorporate all feedback into this doc and update as time goes on.